Connecting to CCSNet WiFi from Windows 10
Summary
CCS Net, our college WiFi network, is accessible
to students and staff. These instructions detail how to connect to this network
from a PC running Windows 10.
Description/Steps
for Resolution
Step One - Launch the Control
Panel
In the Start Menu, select Control
Panel.
Step Two –
Access Network and Sharing Center
Select Network and Sharing Center, and then select
VIEW NETWORK STATUS AND TASKS.
Step Three - Manage Wireless
Networks
Select
Manually connect to a wireless network,
and then select Connect.
Step
Four - Enter Network Information
Enter the following information (Screen 4), then select Next:
Network name:
CCS Net
Security type:
WPA2-Enterprise
Encryption type:
AES
![Manually connect to a wireless network window, displaying fields for network information]()
Step
Five - Modify Network Settings
Select
CHANGE CONNECTION SETTINGS (Screen
5).

Step Six
- Modify Network Settings (continued)
Select the Security
tab at the top of the window, and then select Settings. (Screen 6)

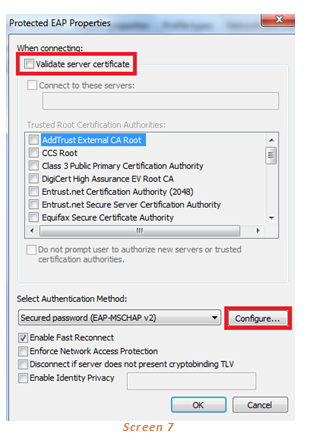
Step
Seven - Modify Network Settings (continued)
Uncheck the box that says VALIDATE
SERVER CERTIFICATE, and then select Configure… (Screen 7)
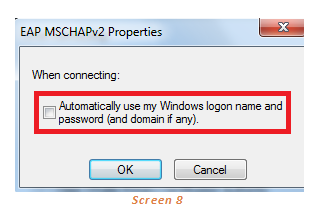
Step Eight
- Modify Network Settings (continued)
Uncheck the box that says, “Automatically
use my Windows logon name and password (and domain if any)”. (Screen 8)
Step
Nine - Modify Network Settings (continued)
Select OK on both the EAP MSCHAPv2 Properties
window and on the Protected EAP Properties window to close them.
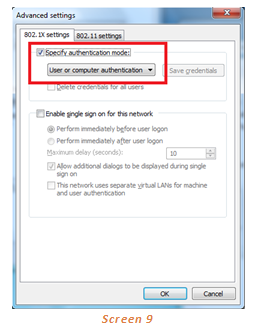
Step
Ten - Modify Network Settings (continued)
In the CCS Net Wireless Network Properties window,
select Advanced Settings.
Select the checkbox for
Specify authentication mode, and set the drop down menu to User
or computer authentication (Screen 9)
Step Eleven - Modify Network
Settings (continued)
Close all the windows by selecting OK on each open window.
NOTE: Do NOT select Cancel or the X in the upper right corner of the windows
or the settings will not save.
Step
Twelve - Connect to the Network
Select the wireless icon at the bottom right hand corner.

Step
Thirteen - Connect to the Network (continued)
Select CCS Net from the list of
networks displayed.
NOTE: CCS Net will only be visible when you are in
range of the campus wireless network.
Step Fourteen - Connect to the Network
(continued)
Select the checkbox Connect
automatically so it reconnects for the future, and then select Connect.
Step Fifteen - Enter
your Credentials
Enter your CCS network username and password in the respective boxes, then
select OK.
Students should add @bigfoot.spokane.edu
after their username.
Faculty and staff should enter one of the following after their username,
depending on which domain they belong to:
-
@ccs.spokane.edu
-
@scc.spokane.edu
-
@sfcc.spokane.edu
Keywords:
Network, WiFi, CCSNet, Windows 10