Connecting to CCSNet WiFi from Linux
Summary
With Linux being an open source operating system, each installation may be slightly different. This is a guide showing Ubuntu 10.10. The steps in this guide may be different from OS to OS but the settings are the same. These instructions are intended to assist with WiFi configuration for the majority of Linux installations, but there have been instances where some Linux devices will not connect to CCS Net.
Description/Steps for Resolution
Step One - Launch Network Settings
Select the network icon in the task bar near the lower right of the screen.

Step Two - Select CCS Net
Select CCS Net from the list displayed.
Note: CCS Net will only be visible when you are in range of the campus wireless network.

Step Three - Define Network Settings
Under the Authentication drop-down field, select Protected EAP (PEAP), and under the Inner authentication drop-down field select MSCHAPv2.
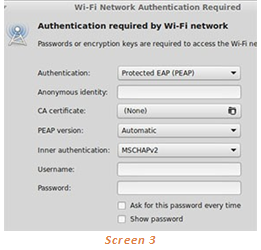
Step Four - Enter your credentials
Scroll down to the Username and Password fields and enter your CCS network username in the Username field and password associated with that account.
Students should add @bigfoot.spokane.edu after their username.
Faculty and staff should enter one of the following after their username, depending on which domain they belong to:
- @ccs.spokane.edu
- @scc.spokane.edu
- @sfcc.spokane.edu
Step Five - Connect to the network
When all your settings are entered, select Connect.
Step Six - Ignore Certificate warning
Once you get to the certificate window, select Ignore.

.
Keywords: CCSNet, WiFi, Linux, Ubuntu